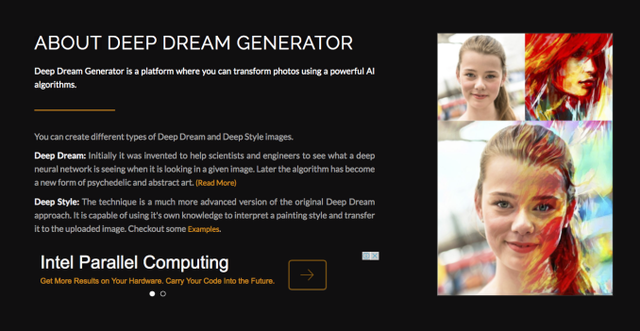
1. deepdreamとは
deepdreamとはGoogleが開発した、ニューラルネットワークを画像処理に用いるとどのようになるかを視覚的に分かりやすくしたものです。下の右側の写真のように、人の顔と赤の髪を持つ人の顔とをうまい具合に組みあわせ、赤の髪の情報を持った人の顔を作るわけです。
2. 実装
内部で行われている動作はちゃんとプログラムやドキュメントを読まなきゃいけませんが、プログラムを実行することは可能です。幸いなことに、プログラムは全てgithubで公開されており、それを用いることで、簡単にdeepdreamを実行することは可能です。(画像処理初心者の方でも下のコードを全てコピーして、画風を変更したい画像を特定のディレクトリに保存し、実行するだけで試すことができます。)
https://github.com/tensorflow/tensorflow/blob/master/tensorflow/examples/tutorials/deepdream/deepdream.ipynb
(↑ githubのURLです。)
まず、
https://github.com/tensorflow/tensorflow/blob/master/tensorflow/examples/tutorials/deepdream/deepdream.ipynb
(↑ githubのURLです。)
まず、
!wget https://storage.googleapis.com/download.tensorflow.org/models/inception5h.zip
install deepdream
をターミナルで実行しましょう。そして、ダウンロードされたzipファイルを解凍します。
次に以下のプログラムを保存します。
次に以下のプログラムを保存します。
# boilerplate code from __future__ import print_function import os from io import BytesIO from PIL import Image import numpy as np from functools import partial #import PIL.Image from IPython.display import clear_output, Image, display, HTML import tensorflow as tf NUM_CORES = 4 model_fn = 'tensorflow_inception_graph.pb' # creating TensorFlow session and loading the model graph = tf.Graph() sess = tf.InteractiveSession(graph=graph) with tf.gfile.FastGFile(model_fn, 'rb') as f: graph_def = tf.GraphDef() graph_def.ParseFromString(f.read()) t_input = tf.placeholder(np.float32, name='input') # define the input tensor imagenet_mean = 117.0 t_preprocessed = tf.expand_dims(t_input-imagenet_mean, 0) tf.import_graph_def(graph_def, {'input':t_preprocessed}) layers = [op.name for op in graph.get_operations() if op.type=='Conv2D' and 'import/' in op.name] feature_nums = [int(graph.get_tensor_by_name(name+':0').get_shape()[-1]) for name in layers] print('Number of layers', len(layers)) print('Total number of feature channels:', sum(feature_nums)) # Helper functions for TF Graph visualization def strip_consts(graph_def, max_const_size=32): """Strip large constant values from graph_def.""" strip_def = tf.GraphDef() for n0 in graph_def.node: n = strip_def.node.add() n.MergeFrom(n0) if n.op == 'Const': tensor = n.attr['value'].tensor size = len(tensor.tensor_content) if size > max_const_size: tensor.tensor_content = bytes("<stripped %d bytes>"%size, 'utf-8') return strip_def def rename_nodes(graph_def, rename_func): res_def = tf.GraphDef() for n0 in graph_def.node: n = res_def.node.add() n.MergeFrom(n0) n.name = rename_func(n.name) for i, s in enumerate(n.input): n.input[i] = rename_func(s) if s[0]!='^' else '^'+rename_func(s[1:]) return res_def def show_graph(graph_def, max_const_size=32): """Visualize TensorFlow graph.""" if hasattr(graph_def, 'as_graph_def'): graph_def = graph_def.as_graph_def() strip_def = strip_consts(graph_def, max_const_size=max_const_size) code = """ <script> function load() {{ document.getElementById("{id}").pbtxt = {data}; }} </script> <link rel="import" href="https://tensorboard.appspot.com/tf-graph-basic.build.html" onload=load()> <div style="height:600px"> <tf-graph-basic id="{id}"></tf-graph-basic> </div> """.format(data=repr(str(strip_def)), id='graph'+str(np.random.rand())) iframe = """ <iframe seamless style="width:800px;height:620px;border:0" srcdoc="{}"></iframe> """.format(code.replace('"', '"')) display(HTML(iframe)) # Visualizing the network graph. Be sure expand the "mixed" nodes to see their # internal structure. We are going to visualize "Conv2D" nodes. tmp_def = rename_nodes(graph_def, lambda s:"/".join(s.split('_',1))) show_graph(tmp_def) # Picking some internal layer. Note that we use outputs before applying the ReLU nonlinearity # to have non-zero gradients for features with negative initial activations. layer = 'mixed4d_3x3_bottleneck_pre_relu' channel = 139 # picking some feature channel to visualize # start with a gray image with a little noise img_noise = np.random.uniform(size=(224,224,3)) + 100.0 def showarray(a, fmt='jpeg'): a = np.uint8(np.clip(a, 0, 1)*255) f = BytesIO() PIL.Image.fromarray(a).save(f, fmt) display(Image(data=f.getvalue())) def visstd(a, s=0.1): '''Normalize the image range for visualization''' return (a-a.mean())/max(a.std(), 1e-4)*s + 0.5 def T(layer): '''Helper for getting layer output tensor''' return graph.get_tensor_by_name("import/%s:0"%layer) def render_naive(t_obj, img0=img_noise, iter_n=20, step=1.0): t_score = tf.reduce_mean(t_obj) # defining the optimization objective t_grad = tf.gradients(t_score, t_input)[0] # behold the power of automatic differentiation! img = img0.copy() for i in range(iter_n): g, score = sess.run([t_grad, t_score], {t_input:img}) # normalizing the gradient, so the same step size should work g /= g.std()+1e-8 # for different layers and networks img += g*step print(score, end = ' ') clear_output() showarray(visstd(img)) render_naive(T(layer)[:,:,:,channel]) def tffunc(*argtypes): '''Helper that transforms TF-graph generating function into a regular one. See "resize" function below. ''' placeholders = list(map(tf.placeholder, argtypes)) def wrap(f): out = f(*placeholders) def wrapper(*args, **kw): return out.eval(dict(zip(placeholders, args)), session=kw.get('session')) return wrapper return wrap # Helper function that uses TF to resize an image def resize(img, size): img = tf.expand_dims(img, 0) return tf.image.resize_bilinear(img, size)[0,:,:,:] resize = tffunc(np.float32, np.int32)(resize) def calc_grad_tiled(img, t_grad, tile_size=512): '''Compute the value of tensor t_grad over the image in a tiled way. Random shifts are applied to the image to blur tile boundaries over multiple iterations.''' sz = tile_size h, w = img.shape[:2] sx, sy = np.random.randint(sz, size=2) img_shift = np.roll(np.roll(img, sx, 1), sy, 0) grad = np.zeros_like(img) for y in range(0, max(h-sz//2, sz),sz): for x in range(0, max(w-sz//2, sz),sz): sub = img_shift[y:y+sz,x:x+sz] g = sess.run(t_grad, {t_input:sub}) grad[y:y+sz,x:x+sz] = g return np.roll(np.roll(grad, -sx, 1), -sy, 0) def render_multiscale(t_obj, img0=img_noise, iter_n=10, step=1.0, octave_n=3, octave_scale=1.4): t_score = tf.reduce_mean(t_obj) # defining the optimization objective t_grad = tf.gradients(t_score, t_input)[0] # behold the power of automatic differentiation! img = img0.copy() for octave in range(octave_n): if octave>0: hw = np.float32(img.shape[:2])*octave_scale img = resize(img, np.int32(hw)) for i in range(iter_n): g = calc_grad_tiled(img, t_grad) # normalizing the gradient, so the same step size should work g /= g.std()+1e-8 # for different layers and networks img += g*step print('.', end = ' ') clear_output() showarray(visstd(img)) print render_multiscale(T(layer)[:,:,:,channel])
deepdream.py
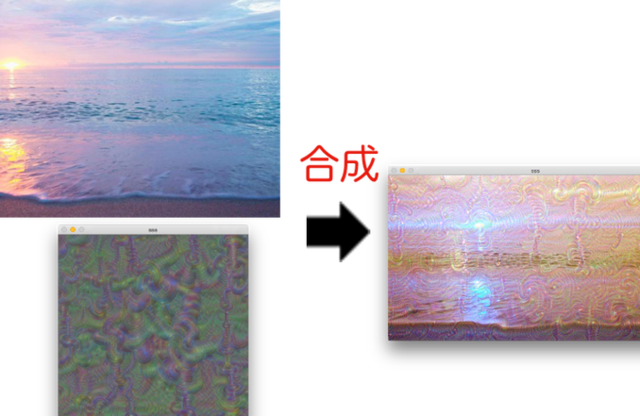
3. 実行結果
いろいろ実行した結果をのせます。上のプログラムの中盤にあるlayerとchannelを変えることで、様々な画像を作り出すことができます。
ぜひみなさんもやってみてください!すごく面白いですよ!
12 件


 エルピクセル編集部